Studio Overview
This lesson gives you an overview of the different functional areas of Studio, and what they do.
The Big Picture

- The upper left corner of the Studio application shows your On Air Status, as well as your Episode Time Clock that displays time-related information about your episode in various ways.
- To the right of the On Air Status and Time Clock, Your Guest Call-In number is displayed. If you have added the Toll-Free Guest Calls feature to your account, your toll-free number will also be displayed. These numbers are what you give to your listeners, so they can call in to ask you questions and talk, live on the air.
- To the right of the Guest Call-In number, the Call A Guest Outdial button is displayed. If you have a premium account that has the Outdial feature, you may use this button to have the BlogTalkRadio conferencing system place a call to your on-air guests. Some guests like this feature so they do not have to pay for their call into your episode.
- The Skype button allows you to use Skype to connect your host call into the BlogTalkRadio conferencing system. This is a premium account feature.
- To the right of the Skype button, your Host Call-In number and PIN are displayed. You need this information to connect your host call to the BlogTalkRadio conferencing system.
- The End Episode button is only displayed when your episode is in progress. Clicking it will end your episode and begin the process of creating the on demand version.
- The blue "i" icon in the upper right corner of the Studio Application allows you to see your Host and Show ID numbers, and also your Host Call-In and PIN numbers. This information is useful when calling our support team for help with your webcast.
- The lower left part of the Studio Application is your Switchboard. This is where you control muting, screening, and hang up for your host line and your guest callers, and where you can see and change the information displayed about your callers.
- The lower middle part of the Studio Application is the Audio Uploads section, which lets you upload audio clips for playback into your episode, as well as see the clips you already have, play them back, and adjust their playback volume.
- The lower right part of the Studio Application displays the tabs for promoting your show, for viewing and editing your episode's information, and for chatting with your audience.
On Air Status and Episode Time Clock
The On Air Status and Episode Time Clock area of the Studio application displays a number of different statuses and time information, before, during, and after your episode.
There are three possible states for the On Air Status display section:
- The default state is a darkened "ON AIR" display, which means that your show has not started yet, or that it is over.
- When your episode is live and on the air, the display will show the "ON AIR" text in a bright red.
- When your episode time slot has ended, but you have not ended the show, the conferencing system goes into a recording state, shown with the yellow text "REC." This is a grace period to allow you to wrap up your episode for the on demand archive version. In this state, you can record audio for the on demand show, but you will not be able to take guest calls, nor will your webcast be live. The amount of time available to you depends on your account - premium users get a longer grace period to end the on demand version of your episode.
Next to the On Air Status area, there is an Episode Time Clock that counts down or counts up, depending on where you are in your episode's timeline.
There are six possible states for the Episode Time Clock:
- Before your episode's scheduled start time, the Time Clock will display a countdown of the time remaining until the start. The text above the clock will state "Time Until Episode."
- Once your episode's scheduled time slot has passed, if you are not connected to the conference, the Time Clock will display a countdown of the available time remaining in your stream, and the text above the clock will state "Waiting For Host." When you see this, you should connect immediately! It means your webcast is live, and your audience may be listening to dead air. You can use the clip playback controls to play audio cilps, regardless of if you are connected to the conference or not. However, if you'd like to speak live to your audience, you'll need to either Skype or Call-In to start or re-start your host conference.
- During the episode's time slot, the Time Clock will display a count down of the amount of time left in your Episode's time slot. The text above the clock will display "Stream Left." If your host call disconnects unexpectedly for any reason, the text above the clock will change to state "Host Disconnected" - you should call back into your episode immediately if this happens, and you will be re-connected with your live audience. You will also get error warnings when this happens, to alert you to the problem so you can fix it as soon as possible. Note that when you are disconnected unexpectedly, you can always play an audio clip using the Audio Clips section, so your audience does not hear dead air when you are not connected.
- When your episode's scheduled time slot has ended, and your show is in the grace "Recording" period, the Time Clock will count down the time left in your grace period. The text above the clock will say "Recording Left."
- When you end the episode manually, or your grace period ends, the Time Clock will be blank, and the text above the clock will say "Episode Ended."
- If you log into the Studio application more than 24 hours before your next scheduled episode, the Time Clock will display all zeroes, and the text above will read "No Episode Set." This may also happen if there is an error in the application. If you're sure you have an episode scheduled within 24 hours, wait a while and the application will reload the episode. If you don't see the Studio Application load the episode and start counting down the time until it starts, check your network connection and reload your browser window.
Guest Call-In Number
The Guest Call-In number is the number you give to your audience, so that they can call into your episode. This number is unique to your account, and when your users call it they will be able to listen to your show, and let you know when they want to ask a question. At the Premium Plus and above account levels, you will also see a toll-free number here, which you can give to your audience instead so they don't have to pay to call into your episode.
Skype Button
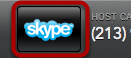
The button with the Skype logo on it starts up the host call using Skype. This feature is described in more detail in the Using Skype For The Host Call section.
Host Call-In and PIN Numbers

The Host Call-In and PIN Numbers display area shows the telephone and PIN numbers that you will need to start the host conference if you're not using Skype. Call the number, and enter the Host PIN when prompted, and you will be connected to the BlogTalkRadio conferencing system to start your episode.
End Episode Button
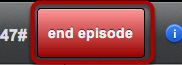
The End Episode button is only displayed during your episode's time slot. Clicking it ends your episode, and starts the processing of the on demand version. You will be given an opportunity to cancel the end episode operation, if you accidentally click the button.
Episode Information Button

The Episode Information button displays a dialog box with your Host Call-In and PIN Numbers, as well as your Host and Episode ID numbers. The Host and Episode ID numbers are used by the BlogTalkRadio support team to help troubleshoot any issues you may be having with your webcast.
Switchboard
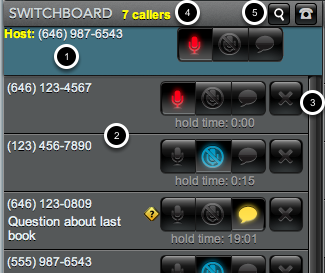
The Switchboard section is the heart of the Studio Application. It is where you control your own microphone, as well see the callers to your episode and control their audio as well.
The controls of the Switchboard are as follows:
- The first line in your caller list is always the Host call, if it is connected. That's you! You will see the host caller ID number, if available, and also see three controls - the Live button represented by a microphone, the Mute button represented by a microphone with a slash through it, and the Screen button, which connects you to the private screening conference. The private screening conference is for you to talk privately with your guests - callers in the screening conference are NOT heard on the live webcast, nor in the on demand audio file of a past episode. When a button is clicked, it becomes active, which is shown by the icon lighting up. When a button is inactive, the icon will be darkened. Note that you cannot hang up the host line with the Studio Application, so there is no Hang Up button as there is for the guest callers.
- Below the Host call are your guest callers. They will be added in the order in which they call into your episode. The Caller ID number, if available, will be displayed for each caller, and below that area is an editable Notes field which you can edit by clicking. The Notes field is text that only you see as the Host, where you can enter a short note with whatever you would like about the caller - their name, perhaps, or information about their question. To the right of the number and notes display are four control buttons. The first three are exactly the same as for the host, but they operate on the guest caller they're associated with - the Live button represented by a microphone, the Mute button represented by a microphone with a slash through it, and the Screen button, which connects you to the private screening conference (Private Screening is a premium feature). When a button is clicked, it becomes active, which is shown by the icon lighting up. When a button is inactive, the icon will be darkened.
- To the far right of the Guest caller display, there is an X or Hang Up button - clicking this will disconnect that caller from your episode.
- At the top of the Switchboard, the number of Guest callers you have in your episode is displayed in yellow text.
Audio Clips
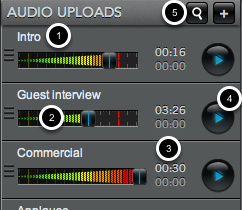
The Audio Clips section displays the Audio Clips that are available for playback in your episode. Each clip is displayed on its own line, and has its own playback and volume controls, as well as a time display. Note that before you connect your host call, you cannot play back any clips: therefore most of the controls will be hidden until the host conference is connected.
The contents of the Audio Clips section are detailed below:
- The name of each audio clip is displayed in the upper left hand corner. This display name is editable in your MyBTR account tools, and you can also set this when you upload new audio clips using Studio.
- Each audio clip has its own volume control. The Studio Application remembers your last setting for volume of each clip - once you find the ideal playback volume for each clip, you can leave it set that way. When you set the volume control above the red line indicators, the volume feature has the ability to add more volume than is present in the original audio file, and this can lead to unpleasant distortion effects for your audience. Listen to the audio clip as it plays back, you can hear exactly what your users hear and you'll know if there are problems.
- Each audio clip has two time displays: the one at the top is the total time of the clip; the one at the bottom is the estimated playback time of the clip. The playback time of the clip counts up from zero once playback has been engaged.
- The Play button, when clicked, will start the playback of your audio clip into the webcast. When a clip is playing back, the button changes to a Stop button. Clicking the Stop button stops playback of the audio clip, and resets the playback time to zero.
- The two icons in the upper right corner of the Audio Clips section are the Filter and Upload Controls. Clicking on the filter icon, represented by a magnifying glass, will drop down a text form field which you can use to search among your audio clips. This can be useful if you have a large number of audio clips and can't find what' you're looking for quickly. Next to the magnifying glass is the "+ " icon. Clicking the + will allow you to upload new audio clips. This functionality is described in the Audio Clips: Uploading section.
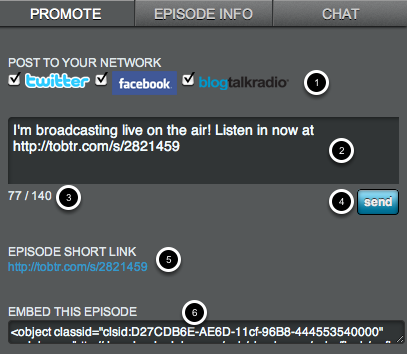
Promote Tab
The Promote Tab is the first tab shown on the lower right of the Studio Application. This tab allows you to promote your show to your users. It is described in more detail in the Promoting Your Show section.
The controls of the Promote Tab are as follows:
- The first part of the Promote Tab allows you to select the social networks that you want to post to. You can post to Twitter, Facebook, and to your BlogTalkRadio Followers. You can post to one or any combination of these three services, simultaneously, by selecting the checkboxes next to each logo. When the checkbox is clicked and the logo is colorized, the service is enabled for posting. For Twitter and Facebook, if the logo is not colorized, the service is not connected with your Twitter or Facebook accounts - click the checkbox to start this process and enable posting.
- The area below the network selection is the message form. This is the area where you enter your message that will be posted to your social networks, and also sent to your followers as a BlogTalkRadio system message. We populate a default message for you, which includes your episode's short URL link. You can use this default message, or edit it to create your own.
- The character count of your message is displayed below the message entry form, if Twitter posting is enabled. This allows you to make sure your message fits within Twitter's 140 character requirements.
- The Send button posts the message you've entered to the selected social networks.
- The Episode Short Link is the shortened URL that links to the Episode page for your audience. You can copy and paste it into the message form when necessary, or use it to open a new window with your episode's public page.
- The Embed This Episode area provides the HTML embed code for you to insert a BlogTalkRadio audio player into your own webpages. The player when embedded will link to the episode you're currently working on. This is a Pro Account feature, contact your BlogTalkRadio support representative to inquire about enabling it for your account.
Episode Information Tab
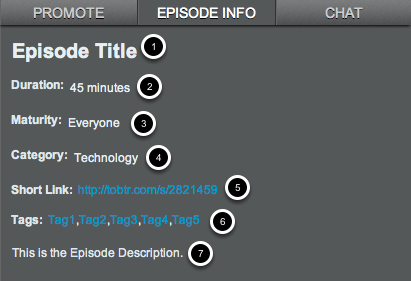
The second tab in the lower right hand side of the Studio Application is the Episode Information tab. Here you may view, and edit, your episode's data. This section is described in more detail in the Editing Episode Information section. To edit any entry, simply click on the text you want to edit, and an inline editor tool will be created.
The information displayed is as follows:
- Your Episode Title is the first item displayed. When you edit this, a text form box is provided.
- Your episode's duration in minutes is the next item. When you edit this, a list of available time slots are provided.
- The Maturity setting of your episode is displayed next. When you edit this, a list of maturity settings is provided.
- Your episode's category is displayed. When you edit this, a list of possible categories is provided.
- Your episode's short link is displayed after the category. The short link is not editable, but clicking it will launch a new browser window with your episode's public page.
- Your tags are displayed after the short link. You cannot edit tags here, but they can be edited in your Upcoming Episodes page.
- Your Episode Description is displayed last. When you edit this, a text form box is provided.
Chat Tab
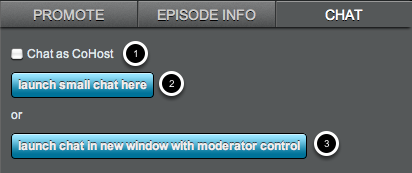
The Chat tab allows you to start a chat for your episode, which will be displayed on your episode's public page in which your users can have a text chat.
The Chat controls are as follows:
- The Chat as CoHost checkbox lets you enter the chat room that a host has created, as the CoHost. If a chat room has not been created, one will be created when you click one of the launch buttons.
- The Launch Small Chat Here lets you start a new chat room, and launches the mini chat interface which is inserted directly into the Studio application. The mini chat interface has limited moderation capabilities, but otherwise allows you to chat with your guests.
- The Launch Chat In New Window With Moderator Control button creates a new chat room when clicked, and launches the full-size chat client in a new window. The full-size chat window has full moderation controls.