Using Skype For The Host Call
This lesson details how to use Skype to call into the BlogTalkRadio conferencing system as a host.
Step 1: Click The Skype Logo Button
Click the button that has the Skype logo on it.
Step 2: Enter Your Skype Name
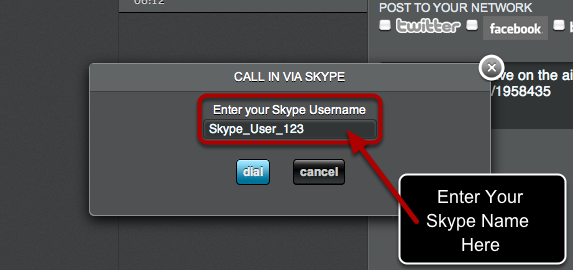
When you click the Skype button, a dialog that asks for your Skype user name will be displayed. Enter the Skype Name you use to login to Skype, exactly as entered. (Your Skype user name is the name you use to login to the Skype service, not your display name.) You do not need to provide us with your Skype password.
Step 3: Click The Dial Button

Click the Dial button to initiate the Skype connection. This will launch the Skype application on your computer, and request that it make a call to us.
Step 4: Let Skype Make The Call
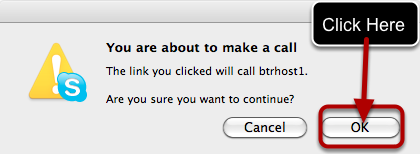
When the Skype application is launched and receives a call request from an external program, it will ask the user if they want to continue the call. You must allow this call for the Skype feature to work. Click OK in the dialog box to let Skype to make the call to the BlogTalkRadio conferencing system.
Step 5: Return To Your Browser Window With The Studio Application
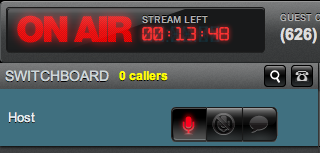
Once Skype connects the call, your Studio application will show the Host call in the Switchboard area. When your episode's start time has passed, you will also see the "On Air" light and the time remaining for your webcast will count down.
That's it, you're connected! Use your Skype application as you usually do, and you will be able to speak with your listeners.
If your listeners complain that they can't hear you, make sure to check the sound inputs in your Skype preferences, to select whatever microphone or audio device you may have attached to your system, and also check your cable connections.
You can also use Skype's "Test Call" feature before your show, to test your audio setup before you're on the air.